We introduced Studio's new SUSE Cloud and OpenStack support in the last blog post, but skimmed on the details. So we'll spend some time here to explain what OpenStack and SUSE Cloud are, as well as how to import images from Studio to SUSE Cloud.
What is OpenStack?
If you are familar with today's popular virtualization platforms, you can think of OpenStack as an open-source implementation of VMware's vDirector. In essence, both provide an easy to use user interface to launch and manage virtual machines plus other resources across your datacenter. OpenStack is currently not as feature rich as vDirector, but that's set to change and it does already have a number of advantages:
- Open-source with a large and active community, backed by many big industry leaders including HP, IBM, Cisco, Rackspace, NetApp, and SUSE.
- Hypervisor agnostic - supports Xen, KVM, QEMU, LXC, ESX(i) and Hyper-V.
- Free of charge, with several companies offering premium support options.
- Massively scalable.

What is SUSE Cloud?

SUSE Cloud is a pre-packaged and supported version of OpenStack that has been tested to work with the SUSE family of products. It is designed for oranizations to setup and manage their own private clouds. It is much easier to install and setup than the vanilla OpenStack.
Importing images from SUSE Studio to SUSE Cloud
So let's get our Studio built images into SUSE Cloud! The steps here are for SUSE Cloud, but it should also work with vanilla OpenStack. There's no graphical user interface to import images into SUSE Cloud/OpenStack at the moment, so you'll have to import it using the command line tool. First, login to your SUSE Cloud instance:

And then download the openrc.sh credentials file from "Settings" => "OpenStack Credentials" => "Download RC File":

Assuming you're using a SLE11 SP2 system, run the following commands to add the Virtualization:Cloud repository and install the the python-glanceclient package. If you're using openSUSE, just change the repository URL accordingly. These packages will eventually make their way into the standard repositories. For example:
  sudo su -
  zypper addrepo \
         http://download.opensuse.org/repositories/Virtualization:/Cloud/SLE_11_SP2/ \
         Virt:Cloud
  zypper refresh Virt:Cloud
  zypper install python-glanceclient
Now you can import your image directly from susestudio.com (or your SUSE Studio Onsite >=1.3 instance) to your SUSE Cloud instance. For example:
  . openrc.sh
  glance image-create --name="Studio built VM" --is-public=True \
         --disk-format=qcow2 --container-format=bare \
         --copy-from http://bit.ly/UHn5C7
You should get output in the command line that looks like the following:

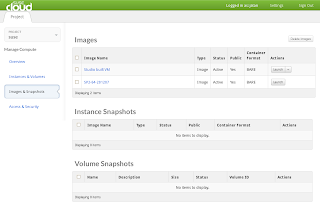
The image will now also show up in the "Images & Snapshots" section in your SUSE Cloud instance:
We can now easily launch instances of this image:
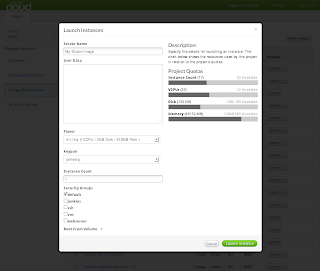
You'll notice in the screenshot that we've chosen the keypair "jamestyj" when launching the instance. This is important as password based authentication is automatically disabled for the root account for security reasons. Without a matching keypair, you won't be able to login to the instance via SSH. Keypairs can be created in the "Access & Security" section of SUSE Cloud. During keypair creation, you'll be offered to save the private key locally. Keep this in a safe and secure place as you'll need to generate a new keypair if it is misplaced. Run the following command on the downloaded private key to ensure the correct file permissions, eg:
chmod 600 jamestyj.pem
You can then connect securely to the instance via SSH. The IP address can be obtained from the "Overview" tab of the running instance in SUSE Cloud. For example:
ssh -i jamestyj.pem root@10.122.160.81
There's also the VNC viewer in the instance's "VNC" tab, though you won't be able to login there since password based logins are disabled. It's useful for debugging if something goes wrong:

As you can see here, it's easy to import images from Studio into SUSE Cloud once you have the initial setup. In the next post of this series, we'll show how to use Studio's WebHooks to automatically import images into SUSE Cloud.
[8 Oct 2012] Update: The third and last blog post in this series, "Automatic image imports with WebHooks" is out now.
